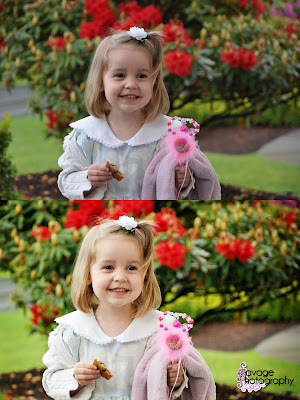
Just a quick side by side to show my love for postprocessing. Oh how I love post processing scenery! You can do a lot more "artsy" stuff with scenery than you can with people. =)
Friday, June 25, 2010
Friday, June 4, 2010
Pirates of the Caribbean Ride
Here are just a few photos from the Pirates of the Caribbean ride at Disneyland. It's one of our family favorites! You ride in a boat, and it's dark.... and a little musty.... but it is Oh so entertaining!! The lighting is just magnificent and the special effects are unparalleled. These photos won't show it, because I used my flash in 3 of them (which always destroys all mood of the site's lighting), and the 1 that I didn't use my flash for is blurry... because of course... we're floating by in a boat, and it's dark. A combo not friendly to a non flash photo, the slow shutter will always show blur. But oh well, it looks kinda cool. Kinda.
Check out the little video I put at the end of Davy Jones.
Photo of the treasure... with some poor fellow who didn't make it.
Here's my no flash photo of the large warring ship scene. 2 ships were firing on each other with cannon balls, fire was shooting, cannon balls splashing into the water... awesomeness. I always get splashed a little. Isaiah was so afraid that the men were actually firing at each other with their muskets because of the fire out the barrels... lol... we assured him that he was safe.
Captain Jack Sparrow at the end of the ride. The animatronics are amazing, Capt. Jack's whole body could move and it looked eerily real! He was in many different parts of the ride, it was like a "Where's Waldo" to always try to find where Capt. Jack was hiding. But here at the end, he had managed to get all the "booty". I guess... I don't really know the movies. :)
Here is a little video of one of the special effects... you should be able to see Davy Jones appearing in a cloud that our boat sails right through. It's creepy cool.
Friday, May 28, 2010
Skin Tones
One of the biggest areas where many photos could benefit from some post processing is: skin tones. I didn't pick the very best example here, because I purposely overexposed this shot a little... but it at least gives an idea.
This is one of the very first photography tips that I learned. I still remember 8 years or so ago, when my friend took my photo that I thought was pretty good and "warmed it up" for me, and the difference was AMAZING. I was dying to know how she made out skin look so much better, like it was a beautiful sunny day, instead of the overcast dreary day that it was.
Skin tones can be very hard to get "right", and I still struggle in this area.... but fortunately, they are quite easy to get "better". But a lot of it depends on training your eyes. In the top photo of Keturah, can you see how her skin is gray? Bluish even? The "tone" of the skin is a cool tone. Well, that's fine if you're photgraphing Russell Crowe in Gladiator when he's at the frozen battle field and the snow is beginning to fall... those scenes are all filmed so dark and gray, it's just perfect. But personally, I like warm outdoor photos for the most part... not always, but usually.
They day that I took this photo it had been raining much of the day, and had just stopped. The sky was thick with dark clouds, it was very dreary outside. But with a little post processing, it almost looks like my daughter was outside on a spring day, not a rainy, dark one.
How to achieve this is different with every program, and I suggest looking up tutorials for your spec program. I use Photoshop, so I can tell you what I did, but it still may sound like gibberish unless you know what I'm talking about. I adjusted the curves to brighten and warm it overall. I then turned up the red until I liked it, then I turned down the blue (which in turn turns up the yellow). I also did 2 other complicated steps that I'm not getting into today... but the result was to defog, sharpen and intensify.
The biggest goal of this post is to get you to begin looking at skin tones with a critical eye... and not settle for blue-gray caucasian skin anymore. :)
Here is another example of "before and after" showing skin tones. Yes, it's very warm, but that's my style. :)
Wednesday, February 25, 2009
Sweet Little Puppy
Thursday, December 11, 2008
The B Family
If they look pixelated at all, that's only because of the sizing for the blog post... they will be crystal clear in real life. It's just so much faster to resize for internet posting than it is to make a proof logo on each example and then wait for the larger file to load. So, just know the prints will be clear. Any of the samples you see here are also available in black and white, and those always print up very beautiful.
B 1
B 3
B 1
B 3
Thursday, December 4, 2008
H Family Proofs
H Family, I absolutely LOVE how your family photos turned out!! I can't wait to see them printed! The photo number/name is to the right of each photo... use this number/name when choosing which ones to order. Each photo that you see here can be printed in any size... 8 x 10, 5 x 7, 4 x 6 and wallets. Let me know if you have any questions! Thank you!
Holly, I later deleted the last two photos because I forgot to fix her skirt in those! Sorry! It was late when I was working on them. I can later darken that area as I did in the other, if you want to use those photos, I had colored samples printed up to show you next time I see you. :)
1
1 BW
Holly, I later deleted the last two photos because I forgot to fix her skirt in those! Sorry! It was late when I was working on them. I can later darken that area as I did in the other, if you want to use those photos, I had colored samples printed up to show you next time I see you. :)
1
1 BW
Monday, December 1, 2008
Proofs for the Lobo Family
Subscribe to:
Posts (Atom)